
In general, combat involving vehicles works much like combat among characters and creatures. The main difference lies in the fact that vehicles can have multiple crew on-board who can act independently.
Typically, small vehicles have only one crewmember who does every task. However, vehicles can have multiple crewmembers for different positions (such as a pilot, an engineer, and a gunner). Large vehicles require a number of assistants for every crew position. So, a single engineer position on a scale 6 sailing ship requires 20 assistant engineers who do not make skill checks, but allow the head engineerÇs skill checks to function properly. Gunners never need assistants, although for some weapons one or more loader may be necessary for it to function practically in a combat situation.
Driver or Pilot:
Example 1: In this example, the pilot is flying an Interceptor in an encounter with a pair of Drone Swarmers. The pilot is 3.5km away from the Swarmers. The Interceptor has a move speed of 75m, but the Pilot has Fast (+1 square, or 8m) and Run (5x run speed), so on his first turn, he uses the run action, but decides not to use Afterburners to save on power. This takes his whole turn. He moves 2430m this turn (75m speed +8m [from Fast] all times 5 [from Run] per second for six seconds). This puts him 1070m from the drones. One of them has been modified to fire missiles, and shoots a guided rocket at him. The other fires its autocannon. The pilot deploys flares against the rocket, and attempts to dodge the autocannon rounds. Fortunately, he is successful.
In his second turn, the pilot uses Cruise to continue moving towards the Drones for 2 seconds, while he Aims his railgun. This moves him another 830m towards the drones, putting him 240m away Ñwhich is in the gunsÇ second range increment. Fortunately, having aimed, he ignores the range penalty and fires his .50 rail gun. He uses a combo with three attacks, so he shoots one drone once and the other twice. The first drone is takes more damage than its toughness and begins dying, the second drone dodges one and is wounded by the other attack.
Example 2: In this example, the pilot is an inexperienced pilot but skilled fighter in a Charon assault mech battling a forest troll. The combatants are 10m away from eachother.
The pilot, nervous to close with the troll, opens by emptying his wrist-mounted PDW. His combo normally allows him three attacks, and the PDW runs dry in two. The Pilot has a +0 Pilot skill and is not proficient with light mechs, so takes a -1 improficient penalty. He normally has a +2 ranged skill modifier, but uses his lower pilot skill. His total attack bonus is +2 (-1 improficiency, -1 scale, +2 for point defence weapon, +2 for auto 2, +0 from skill). The pilot ignores the CharonÇs normal -1 mobility penalty because he has the Armour: Skirmisher technique. The forest troll has target 3, so the pilot hits both times. The troll lacks lightning reflexes, so cannot dodge the bullets. The pilot rolls 11 and 14 for damage, so wounds twice (the troll has toughness 18/12, but the PDW fires AP1 rounds). He uses his third attack to fire the held Heavy Machine gun, which only has a +0 attack bonus (it isnÇt point defence). The pilot curses as he rolls a 2, his shots went wide. He tosses the gun aside and draws his mighty Ogre Sword in his remaining 2 seconds.
The troll, enraged by the bullets, closes the distance to the armoured vehicle (2 seconds of movement moves him 8m closer to the Charon, bringing the vehicle within reach of the trollÇs claws). The troll then uses ROAR (charge, two attacks, Massive Damage). The troll rolls 5 and 2, so he hits the Charon (target 3) once, and misses with the other. The troll rolls 1d8 + 8 for damage, getting a 15 on a lucky roll of 7. The Charon is wounded as the claws rake the tough cerametal plating.
On his second turn, the pilot slashes the troll three times with his Ogre Sword. The pilot isnÇt a trained swordsman, but the improficiency penalties with the vehicle and the weapons donÇt stack. The pilot has +1 weapon skill, but is hampered by his +0 pilot bonus. His total attack modifier is -2 (+0 skill, -1 improficient, -1 scale). Of his three attacks, he only hits once. The mechÇs servos awkwardly respond to his clumsy commands, and he deals a mighty 15 AP2 damage with the diamond-edged blade. The troll is wounded.
Commander/Captain: The captain can make Charisma checks to inspire the crew, Intimidate checks on the crew of other vehicles (if you have open channels of communications), persuasion checks to negotiate with the enemy, and ingenuity checks to try to gain a tactical advantage.
If each character has their own ship, they should all be captains, and control all the NPCs under their command.
If the party all are in the same ship, the Captain can double as another roll É especially the Pilot, who doesnÇt do a lot in large vessels (due to massive mobility and size penalties), or a Gunner.
Regardless of rank, PCs should probably not be ordering other PCs around on a regular basis.
Gunner:
Loader: Some weapons are best suited for use with a loader. The loader can reload a weapon in-between attacks from the gunner. Loaders typically have the Rapid Reload technique, and are often gunners-in-training.
Engineering: many larger vessels carry multiple engineers, and smaller ones often don't carry any.
Every attack the weapon makes costs 1 pp. Disabling this modification is a 2SA. The same weapon can have multiple modifications, but each of a different type. PP costs stack.
|
Round |
DC |
Damage/ Toughness increase |
PP cost per attack/ Turn |
Overheat Roll (D20) | |
|
-1 (overcharge) |
10 |
+1 |
1 |
0 | |
|
1 |
11 |
+2 |
3 |
2 | |
|
2 |
12 |
+3 |
6 |
4 | |
|
3 |
13 |
+4 |
10 |
6 | |
|
4 |
14 |
+5 |
15 |
8 | |
|
5 |
15 |
+6 |
21 |
10 | |
|
6 |
16 |
+7 |
28 |
12 | |
|
7 |
17 |
+8 |
36 |
14 | |
|
8 |
18 |
+9 |
45 |
16 | |
ECO (Electronic Communications Operator): On smaller vessels, this role is sometimes combined with the Commander and/or Engineer. Larger vessels frequently have multiple ECOs. Two ECOs cannot use the same sensors or other equipment at the same time, so vehicles with multiple ECO positions often have multiple sensor or radar devices. The primary skill for an ECO is Science (Computers and Electronics)
Vehicles:
|
Check Result |
Information Received |
|
4 |
Ship scale, number and class of weapons (one heavy and three light, for example), armour (light, medium, or heavy) |
|
5 |
Ship Design,* Skeleton and armour composition, move speed, strength |
|
6 |
Power source, exact weapon stats, ship name (if it has one, otherwise, it simply gives it a computer-generated ID code and can recognize it if later encountered)â“ |
|
7 |
Toughness, shields toughness |
|
8 |
Sensors and communication systems |
|
9 |
Presence and number of living creatures onboard |
|
10 |
Position of all living creatures onboard |
|
11 |
Number of wounds, remaining power points, and general condition of the ship |
|
12 |
Species of all living creatures onboard |
|
13 |
Full abilities and statistics of the vehicle, as if you had its stat sheet. Also, condition of all living creatures onboard. |
|
14+ |
Weak Point: crew can make called shots to the weak point with -2 attack penalty and -4 toughness, and virtually anything else you could want to know about the vehicle. |
|
*If this vehicle has been encountered before, the shipÇs computers tell you all known information. If the vehicle is common, then the database will generally include all information up to DC 8. â“ If the individual vehicle is on the database, it will also tell you: manufacturer, captainÇs name, allegiance, employer, and other data. | |
Planet:
|
Check Result |
Information Received |
|
4 |
Planet scale, distance from star |
|
5 |
Planet gravity, Name* |
|
6 |
PlanetÇs atmospheric content, map of planetÇs geography, average temperature |
|
7 |
Presence and general type of life (flora, fauna, or microbial only Ñ does not tell you whether the fauna is sentient or not) |
|
8 |
Location of major artificial structures |
|
9 |
One planetary feature. Every point higher than 9 tells you one more planetary feature. â“ |
|
10 | |
|
11 | |
|
12 | |
|
13 | |
|
14+ |
Anything else about the planet you could want to know |
|
*If it has been given one. This result will also tell you all known data about the planet from the database â“ from the planetary features chart, such as unstable magnetic poles or tectonics | |
In general, vehicles move just like characters do. There are a few exceptions for non-bipedal vehicles, however:
Depending on the method used to achieve flight, vehicles manoeuvre a little differently. If the vehicle is using fixed-wing movement, such as from jet engines or propellers, it risks stalling if it doesnÇt move at least 5 squares horizontally every round. Otherwise, flying vehicles can move up, down, and horizontally at their speed. This is a bit of an abstraction, but it keeps the game simple.
A stall occurs when a vehicle dependant on wings fails to achieve the requisite lift . This happens when the vehicle does not move at least 5 squares horizontally in a round. Jets and propellers stop functioning, and the vehicle must attempt to glide. To pull out of a stall, the pilot must succeed in a DC 8 pilot check as a 4SA. The DC decreases by 1 point every round after the vehicle begins to stall.
The first, and some would say trickiest, step of space travel is getting out of the planetÇs atmosphere.
Works just like character-scale combat, with the following exceptions:
Flying Vehicles have the following statistics:
If a vehicle collides with another object, creature, or vehicle, there are often catastrophic results.
In the event of a collision (one vehicle moving into the occupied square of another) follow the following procedure:
1. Roll to evade: All creatures, vehicles, etc. can make a Dodge roll to avoid taking damage. The DC is 4.
2. Damage: All targets involved that fail their dodge roll take damage equal to 1d6 + the Base Toughness (from size) of the smallest vehicle (or creature or object) plus 1 per 10 squares of move speed made by the fastest vehicle
In the event of a deliberate Ram by one vehicle, use this procedure instead:
1. Enter the defenderÇs area
2. Roll to evade: the defender (s) makes a Dodge roll. The DC is 4 + the attacker's Pilot modifier - the vehicleÇs scale
3. Damage: both sides take the smaller vehicleÇs Ram damage. If the defender took a wound, the attacker may continue moving and either bring the defender along for the ride or leave him behind.
Wound: When a vehicle takes more damage from a single hit, it is dealt a wound. Wounds function identically with vehicles as they do with creatures. To remove a Wound, the vehicle requires repairs.
Dying and Destruction: Vehicle destruction works almost identically to character death. If a vehicle ever takes more than its Toughness in damage from a single hit, it becomes disabled. A dying vehicle must make a DC 4 strength check every round, with a -1 penalty per wound. Success means it gets to make another check next round. For every failed check, the DC increases by 1. If the DC becomes too high for the vehicle to be able to succeed (ex., it has strength 3 and the DC is higher than 9), then the vehicle is destroyed. If a dying vehicle gets wounded while dying, it is destroyed. Every round a vehicle is dying for, roll once on the Calamity chart.
For every wound a vehicle has, roll once on the Calamity chart to see what happens to it when it starts dying. Multiple of the same effect means reroll. If the effect doesnÇt apply, roll again.
A dying vehicle has a 10% (a roll of 10 on a d10) chance to stabilize each round. A stabilized vehicle is still immobile, but is no longer in danger of dying. A successful Repair check from Engineering (which takes 1 4SA) can also stabilize a dying vehicle.
If a vehicle dies, it explodes. Look at the vehicleÇs Reactor to see how big and powerful the explosion is. The default damage is 1d12 + the vehicleÇs base Toughness (6 at scale 0, 9 at scale 1, etc.) from size in Heat and Slashing damage.
Dying vehicles do not regenerate any pp.
Unless it is important, dying NPC vehicles can be ignored except as obstacles.
Destruction in Space: If a vehicle starts dying in space, there are a plethora of dangers to the crew. As soon as a vehicle starts dying, it begins to lose atmosphere. Certain areas may depressurize. Escaping from a wreck can be an adventure in itself.
Piloting a Dying Vehicle: A dying vehicle can still be controlled by a skilled enough pilot. The pilot takes a -3 penalty to pilot and must make a DC 6 check every round in order to move it at all. Failure means that it doesnÇt move (or, in space, it Cruises).
|
Die Roll |
Calamity |
Effect |
|
1 |
Artificial Gravity Failure |
Ship becomes Zero-G (assuming it's in space) |
|
2 |
No Emergency Lights |
Ship becomes totally dark |
|
3 |
No life support |
In about an hour, the ship becomes freezing cold. See the Adventuring chapter |
|
4 |
Fire |
Whenever a new area is entered, there is a 20% chance the room is on fire. |
|
5 |
Reactor Failure |
One of the shipÇs reactors ceases to function |
|
6 |
Trapped! |
Internal doors aboard the ship have a 25% chance to be stuck. |
|
7 |
Sensor Failure |
One of the vehicleÇs sensor systems, chosen at random, is disabled. |
|
8 |
Defensive Failure |
One of the vehicleÇs defensive systems, chosen at random, is disabled. |
|
9 |
Weapons failure |
One of the vehicleÇs weapons ceases to function, starting with the heaviest weapon and going down from there. In the case of a draw, randomly decide |
|
10 |
Limb Failure |
If the vehicle has any limbs, it completely loses any movement in one. This counts as a ÖkillÇ roll on the called shot table. |
|
11 |
Communications failure |
The ECO loses use one random communications device |
|
12 |
Control loss |
The vehicle gains a mobility penalty. If this is rolled multiple times, the effects stack. |
|
13 | ||
|
14 | ||
|
15 | ||
|
16 | ||
|
17 | ||
|
18 | ||
|
19 |
reroll twice | |
|
20 |
reroll three times |
Any vehicle with an engine has a reserve of Power Points (abbreviated "pp.") The number of power points a vehicle has are based on its engine. A number of vehicular devices 'use up' power points to function. Power points are only regained when the vehicle refuels, recharges its batteries, etc.. Some engine types have a "recharge rate." This is the number of pp (per round) that the vehicle recharges, to a maximum of its normal amount of pp. Engine types with a recharge rate last, unless otherwise specified, essentially forever.
If a vehicle hits 0 pp (even if it can recharge) all electronic systems (i.e., basically everything) immediately shut down until the vehicle gets to 1 or more pp.
Every 8 hours of operation at normal speed costs 1 pp, at double speed costs 2 pp, and at a run costs 4 pp. These costs are multiplied by (the vehicleÇs mobility penalty as a positive number +1). So, a vehicle with a mobility penalty of -1 would multiply the costs by 2. Since vehicles never tire, their maximum overland speed is their Run speed.
|
Location: |
Attack Modifier |
Toughness Adjustment: |
Minimum Toughness: |
Toughness: |
|
Arm |
-1 |
-1 |
Wound |
Wound, Arm cannot be used to carry objects, weapons, shields, etc. until the wound is repaired. This arm cannot be used to make unarmed attacks. |
|
Engine/ Power plant/ Reactor |
-3 |
-2 |
Vehicle loses 2 pp |
Vehicle loses power. 10% chance for the reactor to explode (DC 8 Engineering check by the engineer as an immediate 4 second action prevents this) |
|
Hand |
-2 |
-2 |
50% chance to drop held item, -1 to attacks made with this hand |
Wound, Hand cannot be used to carry objects, weapons, shields, etc. until the wound is repaired. Hand cannot be used for unarmed attacks |
|
Hull/ Torso |
No Change |
No Change |
Wound |
Target starts Dying |
|
Legs |
-1 |
-1 |
Wound, speed decreases by one square |
Wound, speed decreased by an additional 1 square. Leg cannot be used to make unarmed attacks. If all legs are hurt in this manner, the vehicle can only crawl (if it has arms). Character must make an acrobatics check (DC 10) or fall prone. |
|
Weapon Hardpoint |
-1 |
-1 |
-1 to attacks made with these weapons |
Hardpoint mounted weapons have a 50% chance (roll each separately) to cease functioning |
|
Movement System |
-1 |
-1 |
Wound, speed decreases by one square |
Wound, mobility type disabled |
|
Wings |
+1 |
-1 |
Vehicle's flight speed drops by 1 square |
Wound, vehicle cannot fly. (atmospheric flight only) |
|
Sensor system |
-2 |
-6 |
-1 to Perception or Science (Computers) checks made with the sensor |
Sensor disabled |
|
Communications systems |
-2 |
-6 |
-1 to Science (Computers) checks made with the system |
System disabled |
Obviously, the current spaceship movement rules are an abstraction. If you want to add a little realism, you can play with these optional rules.
In real life you canÇt stop on a dime, and thereÇs no top speed in space. A spaceship has to spend as much of its energy slowing down as it does speeding up. These simple rules capture those dynamics without overly complicating gameplay.
You carry your speed from the turn before. When you move on your turn, leave behind a ÖghostÇ marker on the square you left. At the beginning of your next turn, put a marker ahead the same distance as between your current location and the ghost marker. You can move your ship anywhere within one movement distance from there as a 4SA (a single move) or double the distance (a double move). This allows you to attain incredible speed, but you should start decelerating ahead of time.
With Physics on, you do subtract your mobility penalties from your speed in squares, as in the atmosphere. This represents the slower acceleration of clumsier vehicles.
Missiles move at a speed of 600m per round (they are always Double Moving).
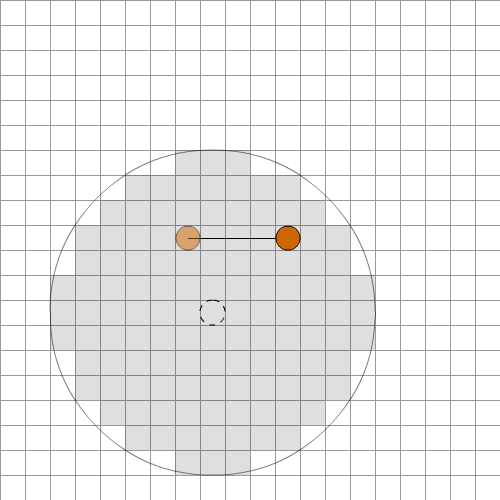
Example One:
Round One:
A Frigate is moving through empty space. Frigates have a speed of six
squares, so from a stationary start, these are the FrigateÇs options
for moving (if it only moves once a round)
The Orange circle is the Frigate, and the shaded squares are the
squares that the Frigate can move to this turn (ie, everywhere within
six squares). The Frigate decides to move three squares south and once
square east, which is well within the area it can move to. It leaves
behind a ghost marker in the original square.
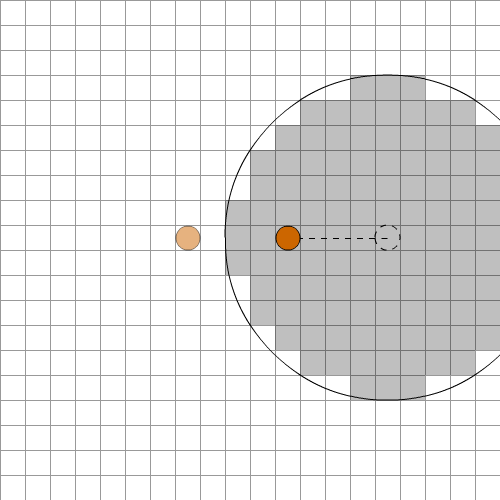
Round Two:
The Frigate places another ghost marker three squares south and one square east of its position at the start of round two, the same distance and direction it moved last turn. The Frigate can move to any square within six squares of the new ghost marker this turn.

The Frigate decides to turn, and goes three squares east and three squares north of the new ghost marker (or a total distance of four squares east of its current position).
The Frigate moves to the dark orange circle, which is within its ring of possible moves. It leaves behind a ghost marker at the light orange circle for next turnÇs movement.
Round Three:
Last turn, the Frigate moved a total of four squares east. So this turn, it places a ghost marker another four squares east of itself, and can move to within six squares of that marker.
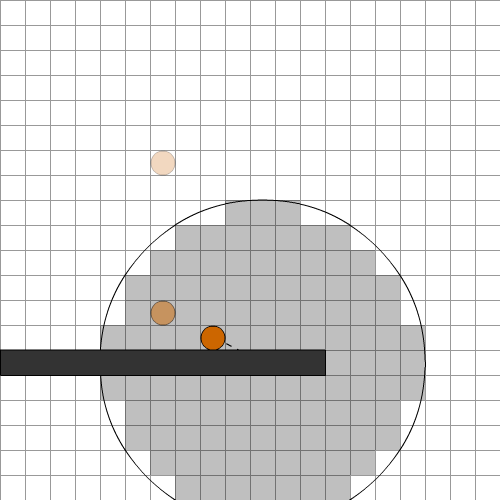
Example Two:
Round One:
In this example, the Frigate has to narrowly dodge an obstacle. As
before, the orange circle is the frigate, the shaded area shows the
FrigateÇs possible moves, and the dark rectangle represents a wall the
Frigate will try to avoid. 
Foolishly, the Frigate flies towards the wall at full speed this round. It leaves behind a ghost token for next turn.

Round Two:
Since the distance at the start of the turn between the Frigate and
the ghost token is 6 squares, place another token six squares in front
of the FrigateÇs new position. The frigate can move anywhere within six
squares of that token.
As you can see, this leaves the Frigate with limited options to avoid a collision. Note that even though the ghost is now on the far side of a wall, this does not necessarily mean a collision. The frigate is still travelling at a speed where it can avoid a crash. If it were going much faster, it would have to use a Jackrabbit stunt or possibly fire afterburners to avoid a crash. It chooses to fly south one square and east two squares.

By doing this, it avoids a collision with the wall. As always, leave behind a ghost token for next turnÇs movement.
Round Three:
The distance at the start of round three between the frigate and its ghost is one square south and two squares east, so place another token one square sound and two squares east of the Frigate.
Many of the available moves will still result in a collision, but the
helmsman decides to fly away at full speed.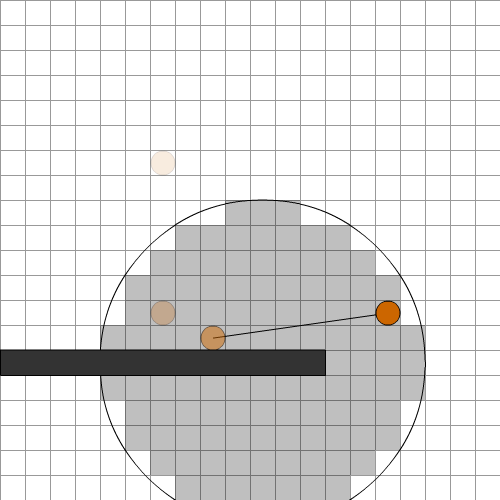
Jackrabbit [Pilot]: Succeeding on a DC 8 Pilot check allows you to move your beginning of turn ghost marker up to one square closer than you. For every 1 point that you beat the DC by, you can move the marker an additional square closer to you. This allows you to make sharper turns.